" I don't care how poor a man is; if he has family, he's rich." ~Dan Wilcox and Thad Mumford, "Identity Crisis," M*A*S*H
******
In staying with the whole autumn theme, I have found some pretty good fall activities for kids to participate in. I am always on the look out for interactive things for my kids to get into. Activities that don't cost you an arm and a leg and are also educational. Here's some pretty good ones that I found and will definitely be trying out with my own kiddos:
NATURE WALK SORTING BASKET:

2 years and up
Materials:
Small, handled basket
Disposable cups
Instructions:
Nature Walk Sorting Basket Craft Step 1 Simply fill the basket with the cups. When your tot's in the woods, she can organize and stash her loot for later examination. As a bonus, the thrill of the hunt just might motivate her to go that extra mile (or quarter mile, at least).
Variations:
Don't have a basket? Make a carrier by poking holes in the sides of a photo or shoe box and tying on twine handles as shown.
SOURCE: http://familyfun.go.com/autumn/fall-crafts/fall-nature-crafts/nature-walk-sorting-basket-940814/
MOSAIC CORNUCOPIA:

Materials:
1 sheet of plain white paper
1 sheet pf black construction paper
Half sheets of construction paper: brown, black, purple, red, yellow, green and orange
White craft glue
Scissors
Pattern
Instructions:
Place white paper over the pattern and trace the pattern lightly with a pencil.
Trim white paper if needed to fit evenly in the center of the black sheet of construction paper. Glue in place.
Tear (don’t cut) remaining construction paper into small squares, about ½” – 1” in size.
Using the penciled pattern as your guide, glue torn pieces onto the white paper in this order:
Brown – horn
Black - horn mouth/rim
Purple – grapes at top
Red – apple to the right, below top grapes
Purple – eggplant
Red – apple below eggplant
Green – leaves below apple
Yellow – apple below top grapes
Green and yellow – corn cob
Green – leaves below corn
Purple – grapes below corn cob
Orange – pumpkin
Glue torn pieces on for stems – brown for the grapes and pumpkin and black for the eggplant. You may also add stems for the apples if you prefer. Allow to dry completely.
Tips:
Use this project to help explain why we give thanks during the Thanksgiving holiday and how the cornucopia symbolizes our bountiful harvests.
Save extra torn piece for another mosaic project.
Hang this on the refrigerator or the front door. Add a piece of yarn to the back as a hanger or hang up with a magnet.
SOURCE: http://crafts.kaboose.com/mosaic-cornucopia.html
SUN PRINTS with PAPER TAPED TO WINDOW...

Materials:
Colored construction paper (make sure you use paper that will fade)
leaves gathered from yard, glue stick, masking tape
Optional: picture frames.
Instructions:
1. Dab a bit of glue onto the back of a leaf, and attach to a piece of construction paper
(If you are going to frame--you can pre-trim the paper to fit a 5"x7" frame--frames can be made from foam, cardboard or card-stock).
2. Tape the paper to a sunny window, with the leaf facing out. Leave up for THREE TO FOUR days, or UNTIL YOU NOTICE that the paper's color has faded. (Some directions say a week or longer--I think this time estimate would be more accurate--you'll know by the fading)
3. Remove from the window and gently peel the leaf off to reveal the print. Frame and hang.
This version from Parents Magazine, August 2005
SOURCE: http://www.kidactivities.net/category/seasonal-fallautumn-art-crafts.aspx
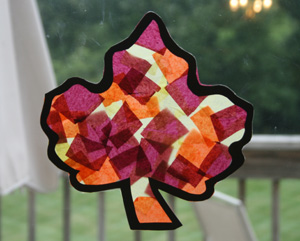
TISSUE PAPER FALL LEAVES:
What you'll need:
Brown or black construction paper
Clear contact paper
Tissue paper in a fall colors
Printable leaf template
Scissors
How to make your Tissue Paper Fall Leaf Craft:
Print out our leaf template. Cut the leaf out, then cut the middle of the leaf out and discard it. You will be left with a thin outline of a leaf. Trace this leaf 'outline' template onto black construction paper and cut out. You are basically cutting out a frame for your craft.
Cut a square of contact paper that is slightly bigger than the leaf. Peel the backing paper off of the contact paper and stick your leaf outline onto it.
Cut tissue paper into 1 inch squares. Make sure to use a few different colors.
Stick the tissue paper onto the leaf making sure to overlap the pieces.
When the inside of the leaf is covered with tissue paper, trim off the excess contact paper/tissue paper.
Hang up on a sunny window.
SOURCE: http://www.allkidsnetwork.com/crafts/fall/fall-leaf-craft.asp
http://myblessedlife.net/2011/09/fall-kids-crafts.html
******
Watching your kids get excited about starting a new project and the pride they exude after they complete it, is priceless. Some of my favorite memories as a child involve crafts. Especially holiday related ones. I can't wait to try these out with my aspiring artists!
-XoXo Jess
No comments:
Post a Comment